Showing posts with label how to. Show all posts

Saturday, December 27, 2008

Being New


The picture above was taken yesterday when my friend Whyy actually got into world. She looks pretty much like I did when I was stuck in my reoccurring but not me shape a couple of months ago :D That's because I gave her all the gear to get her out of Ruth mode. She will be perusing the freebie places next week I am sure and working on getting her familiar shape back -- a good thing for most of us.

I've been talking to quite a few new folks lately -- people who have just dropped by for whatever reason. Their comments seem to fall into the same categories so I thought I would answer a question or two and clear up some misconceptions for those people reading this that are just -- or thinking of -- coming over.

1. There is no money! It looks like you have money? Yep it does.

That wasn't a sign up bonus though, it was more like a placeholder for when money is turned on and a test amount for those working on the feature. The currency is set up on all the regions now, but there are numerous permissions problems to overcome before it is wise to turn it active. Content creators that didn't know there was a problem would loose control of their designs and that isn't good. So pretend you don't see that $2500 at the top of the screen. On the plus side, uploading is still free, so no need to worry about that $20 coming out of your bank account. It never does.

2. I want to BUY things! I want hair (clothes, shoes, AOs -- the list is lengthy). Can I buy things now? Can I buy things in SL for delivery here? Can I GET stuff?

We all want stuff (well most of us anyway). We are used to a material world in real life and in many cases the "other" grid. You can shop at the freebie stores that abound. It is much like starting over when you were new at Phil's if you remember that. Not a good feeling for many of us. If you are a content creator, you can upload your textures for free and make clothes. If you know how or want to learn how, you can make your own shoes, hair, skins, animations etc.

I am betting that most newcomers fall outside the compulsive creativity realm though. For those folks it is mostly a waiting game. People ARE selling goods in SL for delivery here, but there are major permission problems that they apparently don't know about as their goods are not protected. Mostly it is a waiting game. And it can be a game. Find the best of the freebies or make your own goods if you can.

When I arrived a couple months ago I was desperate for hair. I so wanted some good hair. I also wanted better skin. I ended up making both as well as animations. So now I have three new skills and a nice look. I actually am so happy with the me I am becoming that I am thinking my goal in Openlife might just be to never spend any money. If I can't make it, I can't have it. An interesting plan that I don't expect any of you to follow - LOL.

3. Where can I unpack my freebie stuff?

While a few freebie stores let you unpack at their places, you will most likely need to go to a sandbox region. There are four official sandboxes, Sandbox Island 1, 2, 3 and 4. The are in the Northeast section of the content on the edge by the water. There are many private sandbox areas also, but these change as the landholders change. You can ask around for current places. And remember to clean up your messes :D


That's a start. I'll post more as time goes on.

Welcome to the Openlife Grid!

Monday, December 22, 2008

Windlight Migration

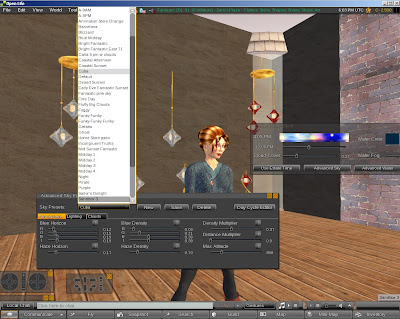
A brief comment on the forums by Sakai Openlife sent me back to pondering over Windlight settings. I lost all the new ones I had made in the Openlife viewer when I updated to R 16. Hence I was a bit unsure about updating to R 16.2. I thought that I could probably replace the new settings with my old ones, but I still had a lot of settings I hadn't transferred over.

click picture for larger view

WARNING: Always make a backup before you work on computer files. I know you know that :D. I also know we all sometimes get so excited about trying something we forget. If this makes perfect sense to you, then give it a try if you like. If it seems complex, then it would be be better to leave it alone.


Step One: Find your Windlight settings on your computer. Mine were in Second Life (R) but yours could be from another virtual world.

Copy one or more of the files you want to include in your Openlife viewer. In this case I moved Cuba.xml.


click picture for larger view

Step Two: Find the Windlight settings in the Openlife viewer. Paste in one or more of your settings. Note that Cuba is showing up in the list. In my operating system it put the file at the bottom of the list and I had to refresh to see it in its alphabetical place.


Start your Openlife viewer and see that the setting has been added. Yeah! That's lots easier than copying down all the numbers and translating them over.


Note: I have noticed that at least on my computer, the Windlight settings in Openlife do not have the same look as they do in Second Life (R). So you may need to do some slight adjustments to get the look you want.

Friday, December 19, 2008

Content Creation - Workarounds

I decided to spend some time at the Openlife wiki today since Sakai asked people to work on it. It is indeed VERY empty. So I am going to repost what I add as time goes on and it will also be a permanent Top Post link at my site. Hope you find it helpful.


What is content creation?


The Openlife grid starts as a empty landscape. It is the ability of the individual to create content that makes the world we see. Content includes buildings made of prims (primitive shapes) and textured with graphics files, as well as your avatar's skin, hair, clothes and accessories. Without content creators, we would all be GRAY shapes.

Any OLG citizen can be a content creator. To explore building with prims, you can work in one of the many sandbox regions. Openlife building tools include the ability to make 100 meter x 100 meter x 100 meter objects as well as micropims down to .001 meters. The different primitive shapes as well as the tools (profile cut, dimple, shear etc.)can be used to make an almost infinite variety of complex objects. Shapes can also be made using sculpt maps.

The original primitives take on the appearance of plywood when you are building. Textures can be added during the building process or on completion of the object. You can edit each prim as a whole, a group of prims together, or you can choose Select Texture from the list of options, click on one surface of a prim and texture JUST that side. You can set the repeats of textures and the direction. There are other choices such as Shine and features such as Light and Flexibility. There are a variety of already uploaded textures in the Library of each avatar's Inventory.

The clothes in Openlife as well as the skin your avatar wears are also made of textures that have been uploaded to the server. Once a graphics file (tga or png) is uploaded, it resides in the uploading avatar's inventory. These files can be shared with others or kept for personal use. The graphics can be made into skin or clothes by dragging textures into the appropriate slot of the Appearance window.

Current Building Issues and Workarounds

The Openlife Grid is in development stage. Current (end Q4 - 2008) building issues include:

  • Cannot link already linked groups of prims

Linking groups of already linked prims can give disastrous results. Workaround: Link at the very end of your building. If you need to add an already linked object to a more complex object your can use the Edit Linked Parts feature and unlink the object ONE PRIM at a time. The alternative to that operation would be to ADD the new prims to the already grouped object ONE at a time.

  • Cannot safely UNLINK a linked object

Unlinking a object can cause what builders here call exploding prims. This seems to happen most often with rotated objects and torus shapes. A typical group object made of boxes and set to 0 -90 -180-270 degrees will often unlink with no problems. Workaround: Unlink ONE prim at a time. Be sure before unlinking that you have a BACKUP of the object.

  • The Undo (Ctrl + Z) operation is not consistent

While Ctrl + Z works well to return a prim to its original position in some cases, it can also - at times - change the rotation of the object as well as simply NOT returning it to its former position. Be prepared for unusual results. Be sure you have a BACKUP.

  • Editing individual linked prims sometimes gives unexpected results

(Note: this appears to be getting much better :D) Editing linked prims - especially moving them - has been problematic. One result can be the disappearance of the other objects of the set while keeping the edit prim only. Editing textures currently works fine. Editing textures on several prims at once works fine. Always make your edits with a BACKUP.

  • Cannot take a coalesced object into inventory and have it remain together

  • Not all LSL scripts are implemented. Some scripting will cause the region to crash.

Wednesday, December 10, 2008

Body Doubles

Getting your shape from Second Life (R) to Openlife -


While some of us are very happy to have a whole new persona in Openlife, others prefer the familiarity of our old selves. Getting your shape from one grid to another isn't all that difficult. It simply takes a bit of time.

If you are using Second Inventory to transfer goods and you have made your own shape or have a full perms shape, you most likely can use the program to accomplish the transfer. For those of us who don't use Second Inventory, it is still fairly simple.

If your computer is up to the challange, simply open up a copy of your Linden viewer with yourself in world. Then start the Openlife viewer with the pod person avatar (wink).

THEN:

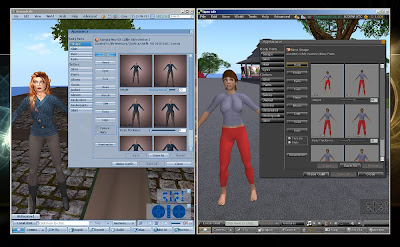
In OL - Open your inventory (Ctrl + I) and from the top menu, choose Create > New Body Part > Shape. It will be called New Shape. Find it in your inventory, right click and WEAR it. Right click on your avatar and choose APPEARANCE. This will take you to the screen shown above.

In SL - Right click on your avatar and choose APPEARANCE. This will take you to the screen shown above.

Then, tab by tab, go through all the fields filling the numbers from your original avatar to your new Openlife avatar. It is a good idea to check the field names often to make sure you aren't one slot off. This can make a HUGE difference in the final out come - well of course it can!

Save periodically. Currently there is NO point using Save As, since it doesn't work. Renaming your new shape before you are completed doesn't work yet either. The best you can do is continue to save your avatar as "New Shape" until you are all done. THEN you can change the name to "Samara Nov 08" or whatever. BE PREPARED for the shape name to revert back to "New Shape" however. Sometimes this can be very frustrating.

If your computer won't run both programs as the same time, you can take notes of your OLD shape parameters and type them into the appropriate slots in the OL appearance editor.

If you make several shapes on your way to your perfect OL shape, you could find yourself shapes shifting (literally) from time to time. This happened to me and has happened to others. Eventually, especially if you delete and purge ALL copies of shapes you don't want, the database will accept YOUR shape as yours. Hopefully this will be remedied sometime soon as it is a very uncomfortable thing to keep having to change BACK into a shape you left yourself in.

Getting an Openlife Account

Getting an account and avatar for Openlife. Written for a not terribly techie friend and added to the blog for others to find as needed.


Here are steps:

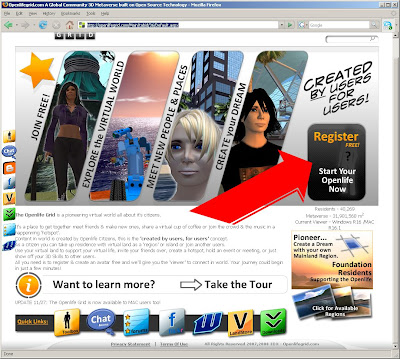
Go to: http://openlifegrid.com/ which currently looks like this:


Choose the Register for Free button (see big red arrow in the screen shot above) and make an account. This is NOT your avatar's name. You make your avatar(s) separately.

After you make an account and record your login and password somewhere for safekeeping, go to the Toolbox and then the Avatar Toolbox and pick out a first and last name for your avatar. Make a password for the avatar; (this is for logging into the viewer). Choose a START location if you wish. The default is Orientation Island I believe.


You also need to download the viewer of course. Use the DOWNLOAD button (currently on the side all the time but a new website design is coming so just look around for DOWNLOAD if it has moved). Download the viewer that matches your system.

Install the viewer. Run the viewer. Put in your avatar names and password and make your first trip to the Openlife Grid.


Note: Currently you can sometimes have problems getting in - especially to Orientation Island and other new folk locations. You can type in different locations in the viewer for starting. Feel free to use Fantastic if you like. It is usually online.