Showing posts with label building tips. Show all posts

Tuesday, January 20, 2009

Working the Angles


We spend our time mostly building on the N-S-E-W axes. (Yep that's the spelling of the plural of axis. I had to look it up to make sure.) We create our prims with those defaults, we pull our prims with the arrow and eventually -- when our builds are finished we rotate that comfy lounge chair into a corner setting.

But sometimes the family of 90 degree angles won't work for us. One of those times is building inside a torus with a sphere floor and cylinder walls :D

Today I added a circular pond of water around the atrium. Yes, you could call it a moat, but that has a fairly unfriendly connotation and that is not the purpose of the water. The purpose is to be surrounded by life and flow and never ending cycles. The energy inside the biosphere is special, but with it comes some building challenges. One is alignment.

It's easy enough to make those corners match and prims meet when you are only moving in one direction at a time, but when you are building at an angle you have to adjust TWO directions in order to accomplish your task. In the photo above, I am aligning the steps to the bridge. The bridge was also built on an angle. In order to get the prims in the correct place, I needed to move the pieces with both the red and green arrows. A lot of back and forth movement and close examination with the camera controls gets the job done.

If you haven't done this and want to try, just set up a small experiment. Make a box and turn it at an angle. Then pull another box from it. Line them up using the red and green arrows a bit at a time. It's a good skill to master.

Saturday, January 10, 2009

A Rainbow of Colors


Building Tip:

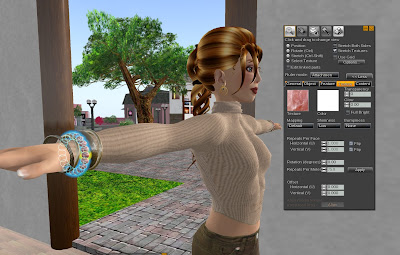
Once your have your items made -- be it a flower, a chair or a bracelet -- it's fairly simple to make a variety of versions of the product. Even it you have made items for yourself, it's nice to have things in a rainbow of colors and textures. Items such as furniture that is not attached to your avatar is quite easy, but the act of attaching makes it a little more complex. Here are some hints. NOTE: There are other methods to do this, but I have had parts of items disappear or lose their attachment orientations using them. So this is one way -- and one that I have not had any issues with :D

  • Make a copy of the item you want to change. Rename it to its new name. So, for example, "Gold Bangle Bracelet Jade" would become "Gold Bangle Bracelet Rose Quartz".

  • Attach the new item. Since you have made a copy of presumably the already fitted item, you should be able to just choose WEAR and have the prims attach in the correct spots.

  • With the Build menu open, choose Select Textures in the Texture Pane. Then carefully click on each piece you want to change to a different texture or color -- holding down the shift key. In this case I wanted to change the texture on each of the 20 bead colors in the bracelet.

  • Camera controls are needed here and it may take you days (weeks - months) to get REALLY comfortable with the panning around. My suggestion is to start out with something simpler than 20 beads attached to an avatar's arm :D.

  • When you have ALL the prims you want to change to ONE specific color and/or texture, go to the texture window and choose the new tga or png from your inventory. You can also open (or upload) a texture and drag it onto the texture window in the build menu.

  • With the texture changed, detach the item and then wear it again. This let's you test that all is OK and "sticking". Beware that textures can revert to the old pattern now and then. This is not an Opensim problem per se as it happens at Phil's also. I haven't seen it happen in OL yet, but it probably will, so be prepared for one bead turning back to it's old color for example.
Inventory Tip:

An odd thing happened to me today that I want to pass on. I had just finished filing about 200 or so textures and 20 products in appropriate folders in my inventory. The sim abruptly crashed; viewer closed, no warning -- you get the idea.

When I got back into world I found those bracelets back in their old spot rather than where I had moved them. Not enough time for the viewer to take note of the change perhaps? Whatever the reason all 200 plus textures were also in my Textures folder rather than "wood", "metal", "misc" etc. So I was sort of bummed.

BUT -- just by accident I found that left clicking on each object or texture put it back in the folder where was supposed to be -- it's planned place in my estimation anyway. THAT was a relief and so cool. So I wanted to pass that along.


Thursday, January 8, 2009

Inventory Safekeeping


We all hate to lose inventory. I have to admit that people -- at least those that write in the forums -- seem to be working on keeping a better handle on theirs. We can only do so much of course and clothes and shapes and skins and textures are simply not "solid" in our virtual worlds.

What we can do -- and what many are doing now after the December mishap (still possibly rectifiable but personally I have little hope) is to rez our products and keepsakes. Store owners don't really have a problem with this. We have stores after all. We can put our goods out and keep them safe. But sometimes we have personal prims -- things that are not products, things that are simply OURS.

Well, hey. This is our world and we have tons of prims. So, I am doing just what I would do in real life -- and in effect it is giving my apartment a more lived in look. I now have wig stands for hair #1 and #3 (#2 went into database lalaland). I also have some shipping boxes full of odds and ends and today I put out my new boots.

It's fun to see things out and about. And hopefully, it will help keep things a bit safer.

Friday, January 2, 2009

The Grid Came Back ....

That very afternoon :D

Alas, no returned inventory but it was good to be back. I uploaded about 250 textures -- some new and some to replace those lost. Being a gal who has gone through WAY too many inventory meltdowns the last few months, I carefully packed them away in crates (yes really) as I uploaded them.

That was an ohsosmart thing to do as the grid went down after about an hour -- and with it all my uploads. The good news was that I had them all in the crates and simply clicked and said "Open > Copy to Inventory" and they were back. Others were not so lucky.

So in one sense this is pretty depressing as I have been finding (a chore) and uploading textures that I lost in the last melt down (burp - LSD overdose whatever ) of the asset server / database (who know?). The good news is that my plan to pack everything up in prims for safekeeping seems like it might work. I think I mentioned it before, but here's the drill.

Building Tip:

For texture, clothing, notecards, sounds, animations or whatever that you cannot simply place in world for safekeeping -- rez a BRAND NEW PRIM, texture if your aesthetics keep you from admiring plywood and fill the contents with what you want to keep. A prim seems to be happy to hold about 100 things. More than that may be overkill.

Remember we have almost unlimited prims. You can store these boxes at 1000 meter or at 10,000 meters or like I am in a real life storeroom (how quaint).

Don't copy boxes over; don't use items you have previously made like books or chests etc. That SO didn't work at Phil's so I suspect it would be a problem here too.


That's my tip for the night.

May tomorrow be filled with FUN as I am so tired of this work "stuff".

Tuesday, December 30, 2008

Endings and Beginnings - Inventory Loss


Much of life is about ending and beginnings.

I went over to Gembong in Phil's domain today to delete my buildings -- and turn those damn tier post to mute. I had NINE of them writing me once each day with messages both in world and in email. That was definitely too much information even when I was there -- let alone after I had gone. I left a Peace on Earth poster and hunt globe there for the last of the thousands of hunters, but deleted everything else.

It was an eery feeling, that emptiness. I was the second person to buy on this sim well over two years ago. It was empty then too, but empty with promise. Now it may have a second chance at a new beginning, but it may just as easily disappear into the ethers. Only time will tell.

So I am firmly footed in my new world. All bridges burned behind me; a tiny 512 foothold to call home when I am there sorting through textures and scripts and things that might be useful in my new land.

************************************************

Things were smoother in Openlife today. No new inventory appeared so I started uploading once again some textures I knew had vanished.
BUILDING TIP:

For those of you that have never lost a bunch of inventory, including textures, the results are odd. Certainly you realize that things are missing, but in the case of textures, it's hard to tell as we usually have hundreds if not more.

Here's what happens. You click on an object you have made -- looking at the texture tab. You might want to change the texture or simply find out what texture was used so you can use it again. Even though you are LOOKING at the object you made WITH the texture on it, the building tool cannot figure out what the texture is because it is no longer in your inventory. The eyedropper will not work either.

If you recognize the texture and have a copy of it on your hard drive -- assuming it wasn't SO long ago that that computer has gone into the recycle system -- you can upload the texture again. BUT, clicking on the same object will still not show you the texture as the original texture on the object was uploaded at a different time and has a different UUID. So, if you want to try and keep consistent and if you believe that the inventory loss won't happen again (wink) you can retexture with the newly uploaded graphic.
In many ways I am lucky. While I lost a lot of textures, they are all on my hard drive as I had JUST uploaded them. I may end up with copies in some cases, but since uploading is free and I am slightly p*ssed (American not Canadian version of the term), I really couldn't care less. I plan to upload new files and ones I have lost. If they miraculously appear in another week or a month, I'll have copies. It is too hard to work without the tools you need.

Strangely enough -- and I am surprised -- there are very few comments about our still lost inventory on the boards and forums. I can't be the only one missing things. I can't be the only one keeping track of what they uploaded, so why isn't there a bit more frenzy? There was plenty last week and now it is all quiet. That puzzles me in a sociological way and puzzles are good. They keep us thinking.

I did do some building today and will share that along with a project very soon -- tomorrow maybe. But its past my beauty sleep hour and time to retire.

I wish you all sweet dreams.

Tuesday, December 23, 2008

A Prim at a Time


My sim was down this morning. Yes, please DO come visit but don't try TPing out as it most often kills the sim. Passing that info around will keep the grid up longer. When you attempt to TP to a sim that isn't online it often kills the region you are in. :D That will change eventually of course. Meanwhile as I waited for restart I worked on some hair.

Girls are vain and most often we are vain about hair! So it's no surprise that our avatars are just as wound up in those shiny locks.

Since I am still missing version 2 of my hair in the inventory meltdown, I decided that a good perk me up would be some nice new and different hair.

I patterned this after a few of my favorite styles. It still isn't flexi and that might be a good thing as flexi and transparency both add to our avatar rendering costs. I do love the color and texture and by the time I was finished I was a happy gal with a new do.

Building tip:

When remaking, adding too, adjusting any complex object I find it works best to do it a prim at a time. So in this project I unlinked the bun (a torus shape I knew I was going to be using a lot on the remake version) and made a copy. I then placed the bun in its new position, made a copy of the already textured prim and changed that new prim to be the next prim in the series. I linked as I went a long -- one at a time or sometimes two or three in series (still linking one prim to the main linked object) as I worked. I took copies often as I was in the sandbox and that is always a bit tricky. I fit the hair as I went along also and then worked on the last saved shape, deleting the old one from the work area.


I have never made hair before and I can't say I love it, but I am happy with my hair. I like the unevenness of the design and it is nice to have something that is definitely unique.

Sunday, December 21, 2008

Inventory Blues - Take 2


It's been a tough weekend in Openlife. The grid has been down a lot and inventories are rolled back to somewhere around two weeks ago except for textures you were wearing. At least that is how it affected my inventory and those of some folks I checked with. I have lots and lots of newish empty folders, missing textures and the like. In theory it should all be returned in a few days.

Since I still have that very bad taste in my mouth from the inventory purge at Phil's where we all seemed to lose OLDER items, I am keeping my fingers crossed. Meanwhile I can upload again and I have done that already with some things. I do NOT want to have to make that SKIRT over again though and it, of course is gone as it is new.

So.

So.

So.

:D

So what can I (and you) learn from this? One thing that has held through from the other grid is that items rezzed in world were "safer". I have a nice daybed that is named Daybed with Three Animations from Sam's Place. Guess what? It now only has one animation which was the FIRST animation I added. That post link is from the 8th so we have some clue as to the the timing of the meltdown as I added new animations to the daybed the next day. That is about the only thing I found actually wrong of the items in world. So, they definitely did better than my inventory.

Long ago and far away at Phil's, I placed copies of all my worldly goods as well as textures etc in safekeeping objects. This, I think, was a fairly good idea. What I DIDN'T understand was that the database would replace my new and improved objects (say a book I had made earlier and then filled with goodies) with the original book - an EMPTY one. So that didn't work there. What I did discover is that on the one safe-keeper object I made NEW, the objects remained.

Building tip:

So my new plan which may again do me no good in the end is to place my backups in brand new just created boxes rezzed one at a time. I can't see any better plan. Objects gone from my database at Phil's (and here so far) are the same objects missing in friends inventories. So my best guess is that my menorahs for example have left Phil's forever and are not to be seen again unless someone had a copy out on a shelf in October. Ya never know.


On the plus side (and there usually is one if you look hard enough for it) I had all my new boots out on stands in the shoe store. So I HAD them. They unfortunately are no longer "wear to fit" and so they had to be refitted. The invisiprims also mysteriously shrank in width so didn't cover the whole shoe. Have NO clue there and will need to check all the others when (oh please) they come back.

So not a fun weekend here on the frontier but hopefully it will all be a faint memory soon and our inventories will be returned in good shape. We can only hope.

I'd really like my updated hair back. It took me a LONG time :D

Friday, December 19, 2008

Content Creation - Workarounds

I decided to spend some time at the Openlife wiki today since Sakai asked people to work on it. It is indeed VERY empty. So I am going to repost what I add as time goes on and it will also be a permanent Top Post link at my site. Hope you find it helpful.


What is content creation?


The Openlife grid starts as a empty landscape. It is the ability of the individual to create content that makes the world we see. Content includes buildings made of prims (primitive shapes) and textured with graphics files, as well as your avatar's skin, hair, clothes and accessories. Without content creators, we would all be GRAY shapes.

Any OLG citizen can be a content creator. To explore building with prims, you can work in one of the many sandbox regions. Openlife building tools include the ability to make 100 meter x 100 meter x 100 meter objects as well as micropims down to .001 meters. The different primitive shapes as well as the tools (profile cut, dimple, shear etc.)can be used to make an almost infinite variety of complex objects. Shapes can also be made using sculpt maps.

The original primitives take on the appearance of plywood when you are building. Textures can be added during the building process or on completion of the object. You can edit each prim as a whole, a group of prims together, or you can choose Select Texture from the list of options, click on one surface of a prim and texture JUST that side. You can set the repeats of textures and the direction. There are other choices such as Shine and features such as Light and Flexibility. There are a variety of already uploaded textures in the Library of each avatar's Inventory.

The clothes in Openlife as well as the skin your avatar wears are also made of textures that have been uploaded to the server. Once a graphics file (tga or png) is uploaded, it resides in the uploading avatar's inventory. These files can be shared with others or kept for personal use. The graphics can be made into skin or clothes by dragging textures into the appropriate slot of the Appearance window.

Current Building Issues and Workarounds

The Openlife Grid is in development stage. Current (end Q4 - 2008) building issues include:

  • Cannot link already linked groups of prims

Linking groups of already linked prims can give disastrous results. Workaround: Link at the very end of your building. If you need to add an already linked object to a more complex object your can use the Edit Linked Parts feature and unlink the object ONE PRIM at a time. The alternative to that operation would be to ADD the new prims to the already grouped object ONE at a time.

  • Cannot safely UNLINK a linked object

Unlinking a object can cause what builders here call exploding prims. This seems to happen most often with rotated objects and torus shapes. A typical group object made of boxes and set to 0 -90 -180-270 degrees will often unlink with no problems. Workaround: Unlink ONE prim at a time. Be sure before unlinking that you have a BACKUP of the object.

  • The Undo (Ctrl + Z) operation is not consistent

While Ctrl + Z works well to return a prim to its original position in some cases, it can also - at times - change the rotation of the object as well as simply NOT returning it to its former position. Be prepared for unusual results. Be sure you have a BACKUP.

  • Editing individual linked prims sometimes gives unexpected results

(Note: this appears to be getting much better :D) Editing linked prims - especially moving them - has been problematic. One result can be the disappearance of the other objects of the set while keeping the edit prim only. Editing textures currently works fine. Editing textures on several prims at once works fine. Always make your edits with a BACKUP.

  • Cannot take a coalesced object into inventory and have it remain together

  • Not all LSL scripts are implemented. Some scripting will cause the region to crash.

Monday, December 15, 2008

Loop Rez - Where ARE You?

It's the day after the update and some things are OK and others? Not so much. We'll see what we see. My script engine is still down. Seems like many are so most likely they all need to be fixed. I lost one texture on one prim which I fixed but no other major damage that I can see. My ugly fall trees came back AGAIN and I deleted them from the trash this time. Eventually I'll get rid of them I guess.

The borders are a bit spongy -- not dropping down but walking into jello spongy. Thing seem to be loading slower but that could be a cache issue. We'll see when I return. MEANWHILE, it's been a busy day.


I tackled prims skirts today. I've been dreading it, but it had to be done -- or rephotograph a lot of vendors and that wasn't high on my priority list either. So I got Samara high in the air in Gembong and Sam high in the air in Fantastic and they remade a skirt.

Now for some reason I thought that being at 100 X, Y an Z would make things easier. It didn't. So all you really need to do when copying over something complex is be at the SAME coordinates in both worlds. It all worked fine and honestly since it took me forever to get the Loop Rez skirt in the first place I actually took less time with this I think :D

Building Tip:

When copying over a complex object that has to be EXACT from one world to another, simply go to the same x,y,z positions in a sim (sandboxes on either end or both would work fine) and make the item over piece by piece matching ALL the fields. Linking with the same root prim is probably optional but in the case of a skirt, important as the root prim has to do with alignment when fitting.


And SO, Sam (and Samara) now have skirts! Well honestly they probably don't care much as neither are skirt gals.


I also made two basic (no scripts) photo studios and put them in the animations shop. And I made the first vendor for the poses. Since I'm working with the "less scripting is better" ethic, I have named each pose by number and people will be able to purchase from a numbered vendor. This of course assumes that script engines are up so that they can cycle through the poses.

I just couldn't make myself do the posters with ALL the poses in one. They always have seemed distracting to me -- too much on one poster. So my plan is to pick out a couple of my favorites from the set and highlight those. We'll see if that is practical.

Anyway I'm happy with how all of today's projects turned out.

I also dismantled my skybox in Gembong and took most of my personal items back into inventory. So moving on is definitely in the wind.

Thursday, December 11, 2008

The Cobbler's Bench


My script engine is still broken but INVISPRIMS are working (yeah) and I wore my heels for over an hour with no disappearing feet (bigger yeah). So what to do today? Make a new version of my favorite boots.

Now I am not the best builder out there. I'm not big on bells and whistles and not a huge fan of sculpties that sometimes take forever to turn into something, so my shoes are fairly simple. I try to pay attention to the details and to the FITTING which is what that picture above is showing you.

Building Tip:

Making shoes is a bit tricky on any world. Prims don't exactly line up as you wish they might and you have to balance strategic details with aesthetics. When you DO get your shoes finished -- be they the simplest sandals or the most complex buckle boots, you need to FIT them. Not only do you need to fit them for yourself, if you are selling them or giving them away -- you need to fit them so others can wear them easily.

I can't tell you how many shoes I have tried on that one foot fit perfectly and the other was WAY off. There is no big mystery there. The left foot simply isn't harder to fit than the right. The designer most likely got tired of fiddling. So fit that first color of a style, go away a day, check it again and make sure it is as good as it can get and THEN make copies in other colors. No point in having to fix six pairs of shoes when you could just get the first one REALLY right :D

On the PLUS side, it seems like attachments come much closer to a real fit in Openlife than on Phil's grid. So you don't have to rotate forever to get your shoe in the general area of your foot. This is a BIG help and my thanks go out to whoever fixed that.

On the minus side, our pose stands here (and even the poses in the library) don't seem to work all that well -- or at all. I've made myself a Tpose of sorts and uploaded my own in order to fit shoes, You CAN fit them when you are just standing but that is pretty tricky and you need to be up for a CHALLENGE :D

See that piece of foot showing through the one shoe? That is what you need to watch out for. Also your foot coming through the bottom of a sandal when there is no invisiprim -- or the invisiprims not covering all of the foot you want to disappear. You also need to watch that the soles of the shoes line up with the floor and that during your maneuvering you have kept the bottoms level -- in ALL directions.

AND speaking of invisiprims, if you have problems getting the server to accept the invisiprim code, you can take a pair of shoes where the script did work (an on a good day issue) unlink it from the finished shoe and reshape it to your new shoe. Works well and gets your shoes up and running.

Meanwhile I have a whole new Fall outfit on with BOOTS and that makes me feel good!

Tuesday, December 9, 2008

Meet Samara


This is Samara. Some of you may already know her, and others of you may get a chance to meet her soon. While I had no intention to have BOTH Sam and Samara in Openlife when I joined, the idea is growing on me. I am wondering just how different they are -- and I suspect that there actually ARE a few differences.

Sam didn't have a lot of time in OL today but she did manage to get some new animations made and inserted into the daybed.
BUILDING HINT: She also figured out that the sit scripts without pose balls that include rotations seem MUCH harder on the sim than the one she adjusted from Mac's code (without rotation). Part of Fantastic's "mission statement" will concern low impact living on the OLG which means -- to me -- that if a script is obviously problematic, it get's tossed. I would rather have the sim up and running (and it has been consistantly for over a week - yeah ) than have all the bells and whistles of Phil's.
SAMARA took over the computer looking for a new 512 lot for her soon to be "minimal" life at Phil's. She is vacating her old digs and moving away and onward in most respects, but will keep her free land for herself and her homeless buddies.

Expect to see her soon with her twin on the OLG. This should be fun.

Saturday, December 6, 2008

Moonlight Fountain


I sprinkled my new tree around and about the sim this morning. So much cheerier and that's always a good thing. Then I decided to work on a fountain for The Village. Now I could have remade a favorite fountain of course, but where's the fun in that? So I started -- once again -- with no plan except that the stone needed to match that already in the courtyard.

Since the fountain was going in the prosperity corner of the sim and since that is tree energy fed by water feng shui wise, I thought, "why not really go for it" and looked up the number that is auspicious for that energy. It was four. Four was simple to incorporate into the fountain and so I did just that.

I tried to make some curved benches to go around the fountain, and while I could DO that trickily, the sit script needed to make my poses work was definitely not doing any good for the sim. So, I abandoned that ideas (stability - stability - stability) and made plain benches and placed them in the grassy area already there. That works. Good to have seating options and nice to have some of my animations and poses around.


Building Tip:

Most of us have learned to "pull a prim" from one already there to keep the alignment. That works very well most of the time. There ARE times however -- like when you have texture and texture rotation and light features and the like already IN your prim -- that simply dragging a copy of the prim you want WITH all those features from another area and then aligning with the POSITION numbers is the easiest plan.

The diagram above shows how I took one of the water prims from the top of one pillar and placed it on top of another by matching the X and Y coordinates. The Z coordinate was the same in this case as the side pillars were all the same height.

I simply clicked on the top ring of the pillar I was headed for and copied those values into the water prim (highlighted in the photo). The alignment is then perfect.

Monday, November 24, 2008

Building a Bench

I will preface this post by recognizing that most likely 90 percent or more of the people on the OLG right now are content creators of some kind. They know how to build -- and how to build well. But, the future gets here pretty quickly and it is ALSO likely that REALLY new folks may be arriving soon. Some will want to build. While I have no big plans at the moment to start from "rez a box", I'm hoping that these few pointers may be helpful in the future.


Since I was on a roll with my conspicuous consumption of prim usage, I decided to build a bench for the park. Not a two prim bench - mind you -- A BENCH. So here we go.

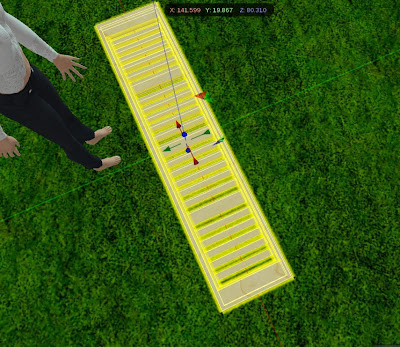
I made a box and adjusted the size to approximate the finished bench size and I hollowed it. I then HELD DOWN THE SHIFT KEY while pulling UP on the prim ( the blue arrow) -- thus making a copy that was aligned with the prim below.

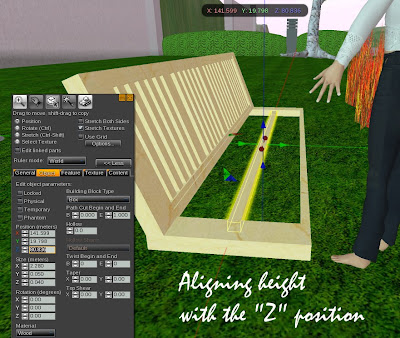
I resized the second prim to make the larger of two slats, taking out the hollow and setting that field back to zero. I made sure that the "Z" values of the new slat and the original prim were the same. Even though I had made the new slat thinner they would be aligned. You can also use Shift + Z here but I have run into problems with that here so staying away from it most of the time.


I then HELD DOWN THE SHIRT KEY (this is called Shift - Copy by many) and pulled to the left and made a copy of that larger slat. Three more slats were needed so more shift copying was necessary. You can of course hold down the SHIFT key and click on a second object and then Shift-Copy them BOTH at the same time. I aligned the slats by eye. You can use math if you prefer.

Using the same method, I filled in the open areas with smaller slats. Then the back was finished. I pulled DOWN a copy of the outside of the back (the one with the hollow) to use as the start of the seat. Then I selected ALL the back prims by holding down the Shift key and dragging across the bench back. With them all selected, I held down the CTRL key to turn on rotation and rotated the back TOGETHER to the angle I wanted. If you are not used to doing this be SURE you click and drag on the CORRECT color of the three colored rotation ball.


Using the same method, I made slats for the bottom of the seat, selected all the prim in the seat (maybe 9) and then moved them as one with the arrows to line up with the back.


So far the bench is ALL about boxes. Rectangles are king here. But a little softness would be nice.

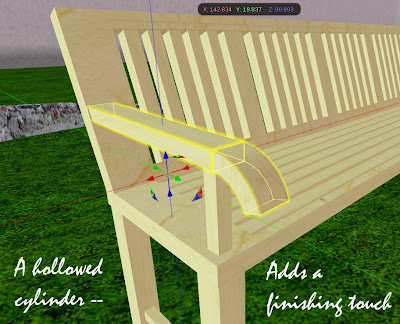
I made a new cylinder, hollowed it and used PATH cut to slice an appropriate shaped section out. The "height" of the cylinder needed to be the same as the width of the chair arm. Other than that I just cut and moved the new curved piece over to the arm to see EXACTLY what width and thickness it needed to be. The thickness was controlled by the hollow.

I highlighted the complete build. (Remember -- at least now at the beginning, linking along the way is dangerous. If you DO link, be sure and unlink the parts of your build before linking them for the final time.) I then double clicked on one of the slats in the seat which was set at 0,0,0 rotation (most always a good plan) and linked the bench. I added a darker wood texture from the library and adjusted the direction and pattern of the textures on the different parts.

It still needs some pose ball or "pillows" for the sit function. By the time you read this, that may not be necessary.

That's a bench. 45ish prims in all.

Saturday, November 22, 2008

Work Ethic Workbench


I've had my region two and a half weeks now. Of course I did some building on the sandbox before then. Still, it was REALLY good to get my workshop more or less finished today. I so love the details. Getting over that "save a prim whenever you can" code and this is good in the land of plenty. I even made REAL thumb tacks for my cork board and have flexi leather swatches dangling. Some sketches add some interest. And boxes of course, shipping and shoe -- you can't have a shoe store without boxes. Mine are ALL made with recycled paper of course.

I finished this area today or at least will be stopping for awhile and see what evolves -- because textures weren't sticking for me. Black shoes became red again in inventory. Scripts not working on the sim but animations still are. So, I got to play.

I was thinking today how much fun I am having here. Partly because it is new of course. I had a lot of fun times in building classes at Phil's when I was learning. FRUSTRATING as even with all my background in graphics and multimedia and the web, somehow building really evaded my grasp. Brain synapses just weren't firing fast enough (sigh). But most of that is under my belt now and so I really can PLAY and that is great. And being able to upload for free -- for awhile at least-- let's me feel I can do more with my graphics. No need to cut corners with textures either. A win - win situation.

TIP: I found today that I could not shrink my tack down below the .o1 barrier. This might be a "today" thing or not. Only more investigation will tell. I'll keep ya posted. I COULD make it smaller. I just had to do it using Edit Linked Parts.

A not too close neighbor came by to visit just now. He spoke Spanish. I am getting a lot of Spanish practice in here and doing fairly well amazingly enough. It's been a long time since I traveled the winters in Mexico :D. It was a fairly humorous conversation as he is a builder and rents casitas (houses) and also has castillos (castles) for sale that he has brought over using SI. So if you read this blog very much you see the humor there. I told him I preferred to work with my hands making things here (wink). And since he couldn't sell me a castle he journeyed onward. It really IS great how people just stop by.

Oh, I forgot to put my new sign up for the Art Center --- can I get back in? We'll see. Yep. I did. New signs. Looks good.

Until tomorrow.

KirstenLee at Corinth


The meeting with Sakai was postponed a day (so it happens tomorrow at the same time I believe). Meanwhile as I was trying to get into world ANYWHERE -- especially the meeting -- I found out in chat that KirstenLee Openlife was giving a talk. It turned out to be VERY interesting. So if you missed it, here are the highlights. I have put things in sentences and added punctuation to make it easier to read. I hope I kept the continuity well.


KirstenLee Openlife:

... also in the upcoming viewer are new features for prim manipulation. In the next point release advanced slice. I'm also looking into off centre hollows this will allow for a much larger range of prim shapes.

I'm also making the partner box in the profile floater a priority. I will make it so people can put in there own partners and save the setting to the users cache.

As you are aware I do the viewer but thats only part of the equation.

Audience: and the connection, is that a viewer prob, or serverbased?

KirstenLee Openlife: The server code is still playing catch up. That's why there is only one dev on the viewer and several on the server side.

I'm trying to expand the graphic card list supported. Since R16 was release, I already added support for lower end ATI cards which LL dropped. The point is I'm interested in inclusion rather than exclusion.

Soon I'm going to have an island called OLdev. OLdev island will be a testbed. And I need ALL of your help. I want your scripts ^^ I'm going to be updating the documentation for LSL in OL. Nnything which is nasty, doesn't work or plain kills a sim. Start to give some inworld feedback and document more extensively. What actually works. I want to include a more comprehensive guide into the viewer.

We have a opportunity to do things differently here and in a much more involved manner.

Audience: I saw you mentioned off center hollows, what about non-simetric valued hollows, say 30X and 90Y hollows?

KirstenLee Openlife: Correct. I want to push the hollowing code further. Imagine for instance a cube with a hollow circle that goes over 99% -- that can do over hollows --105% -- cutting a single prim into 4 or off centre hollows.

On the point of meshes -- we don't want just meshes, but powerful inworld tools for making prims even more useful -- making as much creative possibilitys available to as many as possible, so expect to see prim creation sizes go upto 128m. I agree that the 100m arbitary limit is a little silly and 128 seems sensible.


Under other ideas from the participants was a NO ban lines policy on the mainland which was HIGHLY applauded.

KirstenLee Openlife: Ok some viewer tips.

Who has a nvidia card? 7000 or better?

Advanced menu > debug settings > type in "renderUseShaderNearParticles". Will harness the power of the GPU to render particles.

Ok this is silly but fun. Debug settings again > renderResolutionDivisor - go retro with blocky graphics - bigger the number the more retro it gets.

This is major important -- Don't want your sim to become a blackhole? Don't wear SL ao's / radars etc. Timers and sensors are evil evil things.

You in Second Inventory -- log into a build sim you upload. Don't upload the scripts UNLESS your 100% sure they are tested and safe. The sim will try to compile and run on upload. If it's a particularly awful script -- bang region dies. Hence all the big holes. Better to cut and paste individual scripts and test one at a time

I can't highlight this enough -- the reason the grid has been seemingly so bad lately is down to a lot of imported scripts.

See how many of us are here. No problems. Why? I disabled scripts before we met ^^

I have been looking into the viewer code too and I'm thinking about lifting any limits on link distance in there.

We all get to help build this place :) think of Oldev like crash me island ^^ Gonna be doing some severe prim torture there -- running bad scripts but rather covering up any short comings. Letting as many people know SL was like this in the beginning lets face it.

Lindens used to hang out; everything was cool but they screwed it up. See this sim. It was mine. I gave it up so someone else can have it. Me is homeless ^^ lol, but that's the difference. Both Sakai and me really do [care :) ] -- changed slightly for PG rating.


And don't for the love of god lock items.

The Art Experience


The art building is complete for now. I'm happy with how it turned out. I originally made an open area in the floor so that people could fly up if the teleporter wasn't working. I gave that idea some more thought this morning. Point A: it is a guarantee that the teleporter will not always be working -- at least in the short term. Point B: I have UNLIMITED prims (well pretty much).


The end result -- spiral stairs. BIG ONES. While you can still get dizzy, falling off isn't really a problem. And they DO make a statement. It's a very large space so the stairs work fine. I added some light to the stairs themselves.

TIP: It's always good to look at your build at night. Your visitors need to be able to get around at all times of the day. New folks especially are not aware of their power over the time of day.

TIP: You can turn on BRIGHT in the texture tab (build menu) to lighten an area. This is extremely important with vendors and signs. You can use LIGHT under the Features tab to add cast light (task lighting) to an area.

While it is dark in there right now, I opted to leave it as I expect with paintings and sculpture and the like will take on a brightness. We'll see.


TIP: If you link several objects in OL (like stairs in this case) you will find that they become phantom. Pretty difficult to walk up stairs when they are phantom -- you simply fall through. I assume this will get fixed eventually, but the quick fix for now is to unlink them.

TIP: When you are moving very large prims, you often need to stand on them (or over them). As you move them, they become phantom and you fall through. Currently you can simply fly back up through the phantom object and you land on the prim again. This is if it is a GOOD day on the frontier of course.

This was a fun build. I had no idea where it was going when I started. I just let it evolved and let USE have control over the design. It was so fun to simply build and to be able to play with shapes and see what evolved. I hope the space gets some good use :D

Friday, November 21, 2008

Hammering on the OLG


It's been a busy afternoon on the OLG for me. While it wasn't as SMOOOOOTH as yesterday -- read that as quite a few crashes but getting back on was easy (whew) -- I did manage to get a lot done. Mortus solved my invisiprim problem. I'm not sure if it was the 2004 code (old / simple things work better here it seems) or simply WAITING for the server to find that mysterious graphic referenced in the lines of LSL. Whatever the outcome, I have HEELS!

Now I don't particularly love heels, but other gals do and we all like to feel pretty and comfortable. The definition of comfortable simply varies.


Here is the prim shoe (no sculpties as I don't do that) showing the invisiprims. There are three in all and I added the scripts AFTER I had completely linked the shoe. So it's good to know that's possible. At least TODAY it was (wink). They are simple, classic and 22 prims as I do believe that low prim garb is best in a new world. The metal details were made using the TINY prim possibilities in OL. That was VERY cool


Not everything always goes smoothly when you are building. I crashed in that OhI'mNOTReallyHereEvenThoughItSeemsLike it mode to find all my fitting work on shoe 2 was gone and it was sitting on my shoulder. Ah well, one more time. I now have ONE pair of heels and making the other colors is just time and energy. Yeah.


To celebrate I made a hammer for my workbench. It's important to PLAY a bit. All work and all that jazz. BAD BAD BAD. I can go there. Don't want to do that.

So -- the plan is to have a hammering animation and a hammer and shoes and boxes and all in the work corner of my shoe shop. Ah those unlimited prims. WOOT! So I started with the hammer. I normally build things the size they will be. Once you've done shoes and jewelry, making a life sized hammer is NOT a big deal. But to demonstrate that you CAN make items large and then shrink (except perhaps for those mini prims and the giant revert mentioned in the giant Shuz post) it works.

I also decided to start a section with building tips and things. Nothing formal, just taking pictures as I work. That might help the new builders along the way. No one is very enthused about my Community Region School project so every little bit of help is good.

The hammer shrank beautifully and is now on the work table with some shoes. Maybe tomorrow I'll get some boxes and crates made for effect. And some more shoes of course.

Note: Today I tried the Edit Linked Prims feature while my shoe was on my foot. It worked just as it should. So that other repeatable fiasco (in two sims) must have been a server code oops or something techie. Glad it isn't the norm. Trying a NEW shoe each time you make an adjustment is indeed a pain.

On the history front, the art center is coming along well and I put up the new Made in The OLG signs with hammer in the shoe and skins shops. Me likey! The hammer sort of says it all I think. Working with your hands on the grid. Works for me.

Wednesday, November 19, 2008

Building 101: The UNDO function!


Luckily this isn't MY build, but it looks a bit like my kiosk when I first tried my hand in the sandbox. The undo button (CTRL+ Z) works fine on ONE prim that has no friends. If you have any rotations in a build however it can be VERY dangerous. It is not your buddy OR your savior here -- at least not for now. So beware. ALWAYS take a copy before trying to undo. Most likely you will need it (wink).

Really BIG Shuz!


HMMMM! This was NOT the plan -- although I sorta suspected the outcome and had MANY saved copies of the giant shoe (lifesize version) in my inventory. Eku told me you could stretch to infinite. Well almost infinity -- and that may be the case in some builds, but when you are using the tiniest of prim sizes (grommets in the shoe) then stretching or shrinking gives you a GIANT object.

I am not sure how it decides how big the object will be -- and honestly I don't care. Just BEWARE the resize tool (wink). Of course I have a nice giant shoe now. Too bad that wasn't the finished model. Still I know how to get one if I need one.

Later Edit:

Fantastic went down a few more times today but I found that actually reporting it as Sakai mentioned in the meeting, got it back on line in an hour or so. That's pretty good with all they have to do.

It's been down again but I did get sent over to Welcome Island and put the rest of the skins together and one set of sweaters. Boring but I am getting faster. Somehow I ended up in the sandboxes and finished the shoes up. So one charcoal pair all done and the other colors will be easy. Yeah!

The animation and sit problems are not going away. Animation appears to be the free program so I'll check that soon. I may have to live with strategically camouflaged pose balls for awhile. Oh well.

Sunday, November 16, 2008

Animations 101


It all started because Sam had NO poses. VERY boring pictures with no poses. So I installed qavimator for the second time. The first instance I simply hated it. I had just quit my "day job" which was mostly Flash animation and perhaps it was simply too CLOSE to that to seem like fun. But today was different. Yeah.

Things went smoothly and well and I have a lot of maybe I can use them someday poses like tai chi - LOL etc. Somewhere along the way I got snagged by the muse and started an animation. I had absolutely NO plans where it might go but after a few frames I decided it looked like someone smoking and so continued along that vein. Sam has never smoked and neither has the person behind Sam, but I have to admit it WAS sort of relaxing. I made a quicky cigarette (no smoke or embers) and we had ACTION.


I'm not sure if virtual bad habits are addicting. I guess they could be. But I guess I'll take my chances -- AND work on some modeling poses sometime soon. It was a FUN afternoon. You just never know where your virtual day will takeya.